 |
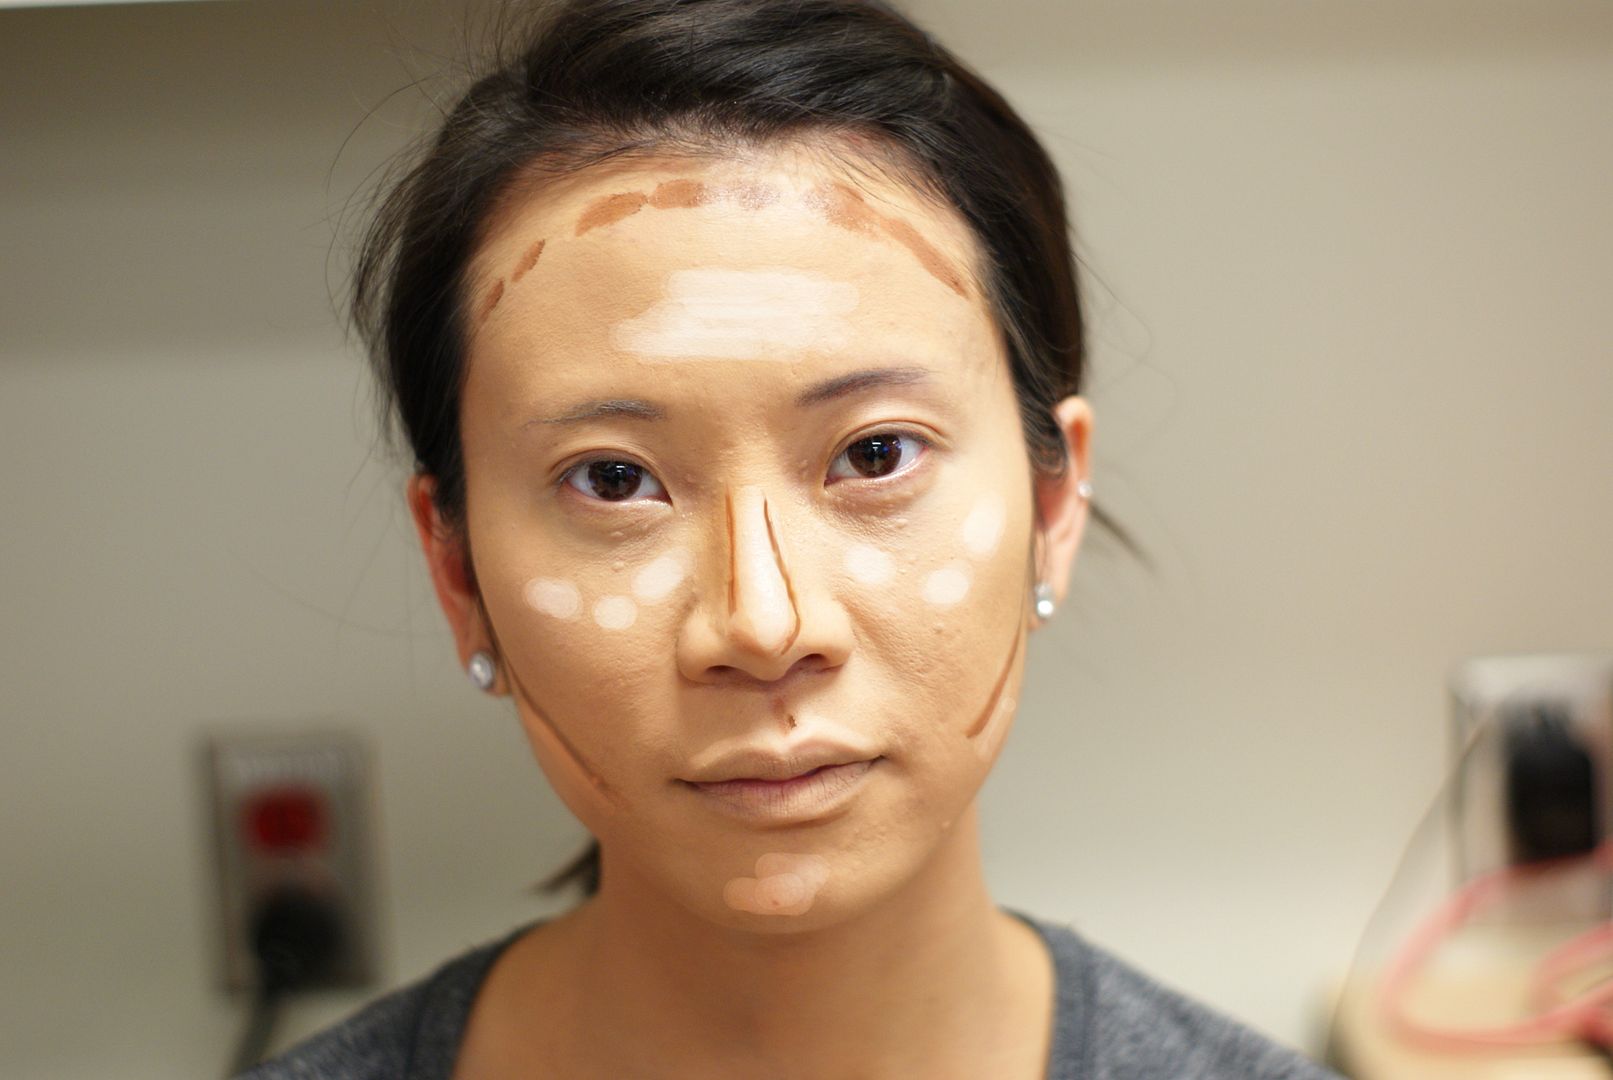
| Thanks Melissa for being a model |
What is contouring
& highlighting?
Contouring can be defined as
strategically placing a darker shade of foundation or concealer to areas of the
face to enhance facial structure and to give it definition. Highlighting refers
to applying a lighter foundation or concealer on areas of the face that would
naturally reflect light, giving the face a soft glow. A little goes a long way,
so here are my how to's...
1. Starting
point
Depending on how defined a contour and highlight is desired, you first need to establish what products will work best for you. Both contouring and highlighting can be achieved with either creams or powders. Personally, I find creams easier to work with, as they are buildable and allow you to blend effortlessly. Powders provide a more subtle and matte finish which is great for an everyday look. Choose a foundation color 2-3 shades darker and lighter than your own complexion.
Depending on how defined a contour and highlight is desired, you first need to establish what products will work best for you. Both contouring and highlighting can be achieved with either creams or powders. Personally, I find creams easier to work with, as they are buildable and allow you to blend effortlessly. Powders provide a more subtle and matte finish which is great for an everyday look. Choose a foundation color 2-3 shades darker and lighter than your own complexion.
2. Tools needed
Foundation brushes and/or beauty blenders (sponge) are crucial to achieving a flawless and blended look. A slightly damp beauty blender works well with cream based products to ensure that the foundation or concealer is well blended while securing the right brush will help with an even and distribution of powder based products
Foundation brushes and/or beauty blenders (sponge) are crucial to achieving a flawless and blended look. A slightly damp beauty blender works well with cream based products to ensure that the foundation or concealer is well blended while securing the right brush will help with an even and distribution of powder based products
3. Face mapping
After your regular foundation application routine, you are now ready to contour & highlight. Now, this could go very wrong if the placement of the makeup is incorrect, however with practice I've learnt that the placement is pretty universal, but how much or how little will depend on the individual's face shape.
After your regular foundation application routine, you are now ready to contour & highlight. Now, this could go very wrong if the placement of the makeup is incorrect, however with practice I've learnt that the placement is pretty universal, but how much or how little will depend on the individual's face shape.
a. With
your foundation brush or sponge, first draw the contour lines along the: cheek
bone, jawline, perimeter of the forehead, outer ridges of the nose (along the
bridge), and under the lip.
b. With
your second foundation brush or sponge, draw your highlight lines on: center of
forehead, own the bridge of the nose, cupids bow, chin and underneath the eyes
& cheekbones. Now blend!!! The lines shouldn't be visible; the overall look
should appear seamless!
4. Setting your product
If you used powder to contour, then you could stop here. When working with cream based products I recommend setting it with a powder in the same shade as the contour and highlight, as this will not only set but ensure your makeup lasts longer.
If you used powder to contour, then you could stop here. When working with cream based products I recommend setting it with a powder in the same shade as the contour and highlight, as this will not only set but ensure your makeup lasts longer.
5. Contouring/Highlighting a darker complexion
The opposite can be true when contouring and highlighting on a very deep complexion. Depending on how deep the complexion, you could skip the contour foundation step and go directly to highlighting. After you apply your usual foundation, next find a foundation cream, concealer or powder that is a couple of shades lighter than the darkest part of your face. Apply this color to the areas of the face where light would naturally reflect: cheekbones, bridge of the nose, center of forehead & chin and blend then set with powder of same color.
The opposite can be true when contouring and highlighting on a very deep complexion. Depending on how deep the complexion, you could skip the contour foundation step and go directly to highlighting. After you apply your usual foundation, next find a foundation cream, concealer or powder that is a couple of shades lighter than the darkest part of your face. Apply this color to the areas of the face where light would naturally reflect: cheekbones, bridge of the nose, center of forehead & chin and blend then set with powder of same color.
Sincerely Preet
Hoped you enjoyed the post
Until Next Time
Don't forget to stay connected, Follow now on..
*Preet of Bindi Studio, is a freelance hair and
makeup artist and the views and opinions on this blog post are solely hers.
See the finished product and find Preet on instagram @bindistudio
